Overlaying multiple pictures together is one of the most basic picture editing techniques. It is not simply putting a photo on top of another photo but a process of artistic creation by which you can make surreal effects and convert imagination into reality. It sounds simple. But combining two pictures with transparency requires more skills than ordinary overlaying. If you are searching for how to overlay pictures with transparency, you can find the best solution in this guide.
In this article, you will find out the following:
Part 1: How to Overlay Pictures with Transparency on PC
Part 2: How to Overlay Images with Transparency on Phone
Part 3: How to Superimpose Pictures with Transparency Online
Conclusion
Table of Contents
Part 1: How to Overlay Pictures with Transparency on PC
This section offers two practical solutions on PC except for Photoshop. Read on to learn what the other is!
1. Overlay Images with Photoshop Alternative
WorkinTool Image Converter is a free alternative to Photoshop. Everybody knows that mastering Photoshop is not an easy task. This photo editor requires a license payment and needs more advanced skills to operate. Compared with Photoshop, WorkinTool Image Converter features free pricing, simple operation, and a straightforward interface.
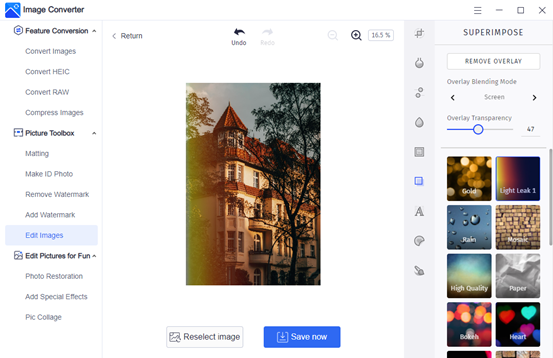
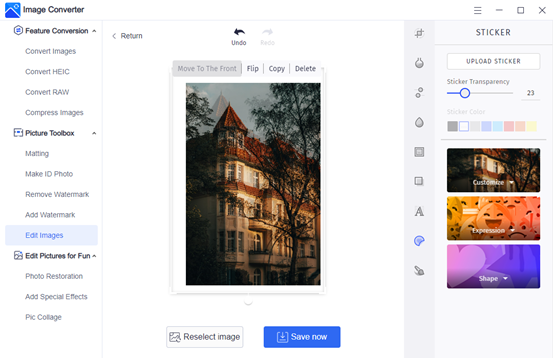
It works well as an image editor and converter, enabling you to freely overlay two pictures together with or without transparency and convert the overlaid picture to any format. You can use the Superimpose feature to choose preinstalled overlay blending modes and adjust overlay transparency or use the Sticker feature to upload any picture you want to blend with the original image. Learning how to overlay pictures with transparency using WorkinTool just takes you a few seconds.
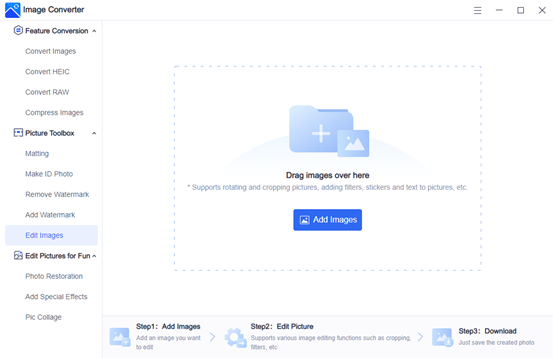
Step 1: Open WorkinTool Image Converter and go to Picture Toolbox > Edit Images and upload a picture.
Step 2: Use the Superimpose feature to choose overlay blending mode and move the slider to adjust overlay transparency.
Step 3: Or go to the Sticker feature > UPLOAD STICKER to add any picture you like. You can move the slider to control sticker transparency as well.
Step 4: Press Save now to download the overlaid image to your computer.
Notice: WorkinTool also works as a background remover. You can cut out an image and add a new background to it. Just head to Picture Toolbox > Matting > Portrait Matting/Item Matting. It supports bulk matting and picture proportion changing. You can use this feature to quickly make a picture transparent background and resize it for posting on Instagram, Twitter, and other social media.
2. Superimpose Pictures with Photoshop
There is no doubt that Photoshop is the most professional picture editing software. PS always provides practical solutions, whether to make transparent color overlays or simply put two pictures together. If you’ve already installed this photo editor on your computer, try the following steps to overlay images with Photoshop.
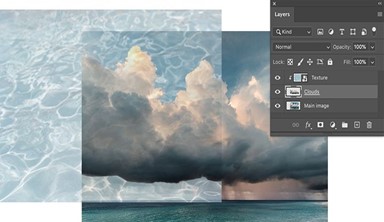
Step 1: Open a picture in Photoshop, and drag and drop the secondary image as a new layer.
Step 2: With the second layer selected, resize and reposition it.
Step 3: Open the blending mode menu (which says Normal by default) and select the one you like.
Step 4: Control the layer transparency by clicking on the downward arrow icon of the Opacity box on the right side.
Step 5: Click Export to save the overlaid image.
Notice: You can fine-tune the overlaid images with Photoshop. The Mask tool and Brush tool allow you to choose the specific area to be overlaid. Also, you can click the adjustment layer button at the bottom of the Layers panel to change the layer hue, saturation, lightness, color balance, and so on.
Part 2: How to Overlay Images with Transparency on Phone
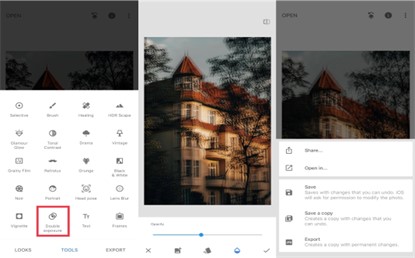
There is no built-in app on iPhone that has an overlay feature. So it is necessary to install a third-party overlay pictures app to do that. Snapseed is such an app, suitable for both iOS and Android systems. This photo-editing application doesn’t require registration. It enables users to enhance photos with a bunch of tools and filters. Let’s see how to overlay pictures with Snapseed.
Step 1: Install and open Snapseed on your phone, then tap anywhere to open a photo.
Step 2: Tap TOOLS > Double exposure to add the second layer.
Step 3: Tap the droplet icon to control the layer transparency by moving the opacity slider.
Step 4: Click the √ icon to save the change.
Step 5: Tap EXPORT to save the overlaid picture. You can directly share it on Instagram.
Part 3: How to Superimpose Pictures with Transparency Online
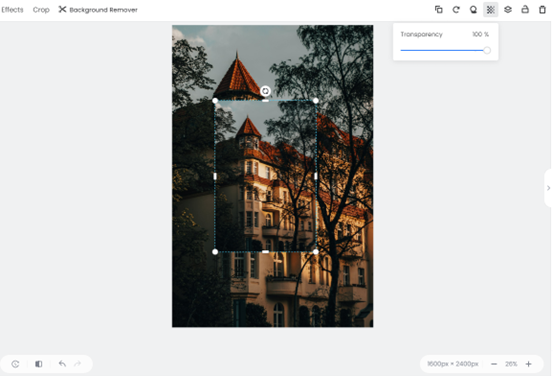
There are many easy-to-use picture editing programs like Fotor you can find online. It is more convenient than any desktop software or mobile app. The downside is that there might be safety issues with sharing the picture with third parties. It may take more time to upload, process, and download an image. And you need to have a stable network to enjoy the online features. Fotor offers picture editing tools after you sign in. So you need to register an account before overlaying two pictures together.
Step 1: Go to Fotor online photo editor.
Step 2: Click Open image to upload your main picture.
Step 3: Press Add your images as elements to add the secondary picture.
Step 4: Resize and reposition it, and click on the Transparency icon on the top to control opacity.
Step 5: Press Download on the top to save the overlaid image.
Conclusion
This post offers four picture overlay tools enabling you to superimpose pictures with transparency on Windows, Mac, iPhone, Android, and online. All photo editors are free except Photoshop. You can select one as you like. Hope this post is intuitive!
