If you are a Brother printer user, you should know how to Connect Brother printer to Computer to get your important file printouts or important documents. If you don’t know how to do that, let us help you. In this blog, we’ll provide you with a step-by-step guide on how to connect your Brother printer to your computer, covering both wired and wireless options.
From important work documents to personal photos, printing is essential for many tasks. That’s why you should have a printer that works smoothly with your computer. And when it comes to reliable printers, Brother printers are one of the top choices. But it’s not enough to have a reliable printer and not know how to use it with your computer conveniently. So, in this blog, we will tell you how to connect Brother printer to Computer clearly and concisely. We have covered both options whether you prefer a wired connection or a wireless setup.
Before getting into the technical aspects of ‘how to connect Brother printer to computer’, here are some basic requirements to need to take into consideration:
- You need a USB cable if you opt for a wired connection between the Brother printer and the PC.
- The printer driver is important for connecting your printer to your computer or laptop. It lets both devices communicate effortlessly. You can download the latest Brother printer driver here: https://support.brother.com/
Table of Contents
3 Ways to Connect Brother Printer to Computer
1. How to Connect Brother Printer to Computer Using USB Cable
Most users prefer to connect their Brother printer to their computer using a USB cable. If you are one of them, follow these steps:
- Check the ports on your Brother printer and your computer to know what type of cable they support. Brother printer usually supports AB-type USB cables.
- Connect the B side of the cable to your printer port and the A side to your computer’s USB port.
- Ensure, the cable and ports are compatible and don’t lose the grip.
- Once done, switch on the printer and test it.
If you want to know, how to connect Brother printer to computer wirelessly, the next two options are for you.
2. How to Connect Brother Printer to Computer Using WIFI
If you want to use your printer wirelessly and have Wifi available, you can connect your Brother printer to your computer using the printer’s control panel. Here is how:
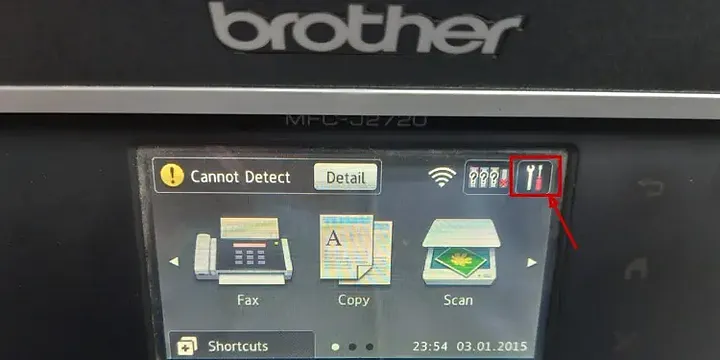
- Switch on your Brother printer and select the ‘Settings’ icon on its home screen.
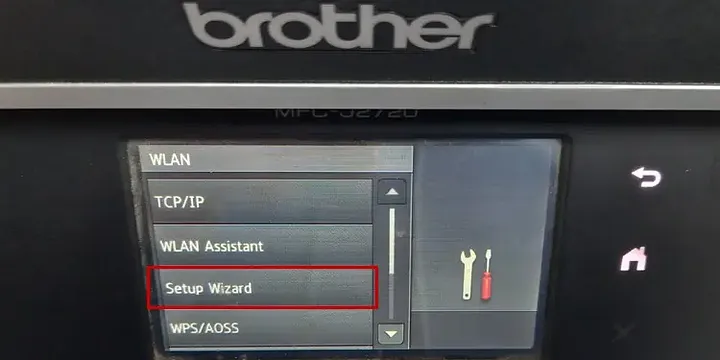
- Here, choose the Wifi icon, then you will see various options on the screen, select the ‘Setup Wizard’ option.
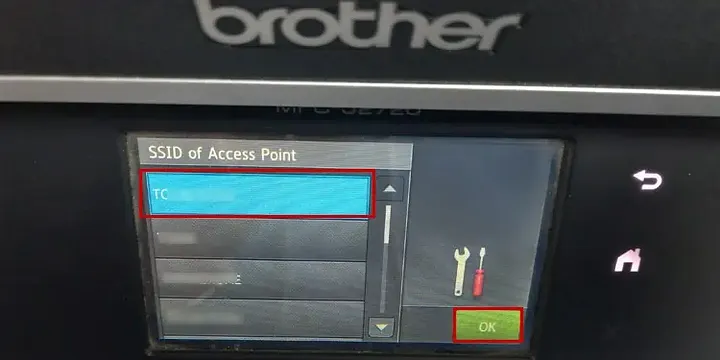
- Now, you have to choose the network you want to connect to, so select the ‘SSID’ network.
- Click the ‘OK’ button.
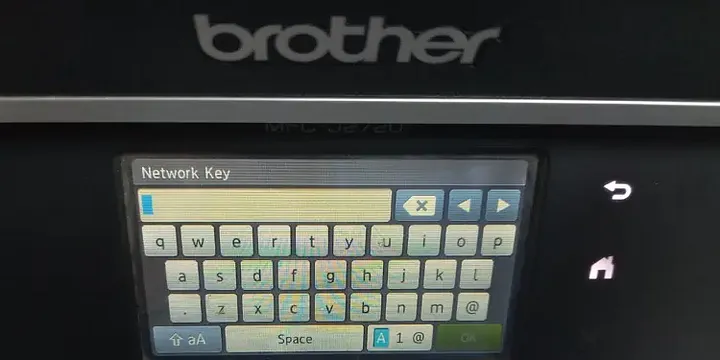
- You will be asked for the Network security key, enter the right key and click the ‘OK’ option.
- Wait for some time and you will get access if you have entered the right network key.
3. How to Connect Brother Printer to Computer Using Bluetooth
If you are still looking for ‘how to connect Brother printer to computer,’ here is another option for you. You can use the Bluetooth settings and connect your printer to your computer. Here is how to do it:
- Look for the local Bluetooth name for your Brother printer. Now, there are different ways to find this name based on the model.
- For TD-4650TNWB/TD-4650TNWBR/TD-4750TNWB/TD-4750TNWBR, go to Interface -> Bluetooth -> Status on the LCD screen.
For RJ-2035B/RJ-2055WB/RJ-3035B/RJ-3055WB, check the rating label on the back of the printer. The default Bluetooth Local Name is usually “PS-*****” where ***** is the last six digits of the Bluetooth MAC Address.
For Windows Users
- Now, open the Windows settings by pressing ‘Windows + I’ keys and select ‘Bluetooth & other devices.’
- Turn on the Bluetooth function on your computer and click on ‘Add Bluetooth and other devices.’
- Then select the ‘Bluetooth’ option and click ‘Bluetooth local name.’
- Here, add the Bluetooth local name for your printer.
- Follow the on-screen instructions to pair your Brother printer to your computer.
For Mac Users
- On your Mac, go to the Apple menu and select ‘System preferences.’
- From the preference window, choose ‘Bluetooth.’
- Turn on the Bluetooth function and click the ‘+’ button to add a new device.
- Now, your Mac will start searching for the available devices. From the available devices, select the local Bluetooth name of your Brother printer.
- Then, follow the on-screen functions to pair your printer with your computer.
- Once done, based on your printer model you will see if the connection is completed. Either you will see the Bluetooth icon displayed on your printer screen or the Bluetooth status LED indicator will turn blue.
These three methods answer the question ‘How to connect Brother printer to computer.’
Interesting Blog:- How Much is My PC Worth? Excellent Guidance
Printer Driver Installation Tips
- If you are facing issues connecting your printer to your computer, you may have an outdated or corrupt printer driver. You should update the printer driver. You can download the latest printer driver for your Brother printer from here: https://support.brother.com/
- Here is how to install the printer driver on Windows and Mac
Windows
- Visit the official Brother website or click on the above link and install the correct printer driver based on your printer model.
- Once the download is complete, find the file and double-click it to run the installer.
- Follow the on-screen instructions to complete the installation process.
- If you are connecting your printer using a USB cable, ensure it is powered on and connected to your computer properly.
- After the installation is completed, restart your computer. Now, your printer should recognize your printer.
Mac
- The first step remains the same for Mac.
- Once the printer driver is downloaded, find the driver file. It is usually a .dmg
- Now, double-click on the file to mount the disk image. This will open a new window with a driver package.
- Double-click the driver package file, this will start the installation process. Follow the on-screen instructions to complete this process.
- Once the installation is complete, go to the Apple menu > System Preferences > Printers & Scanners.
- Here, click the ‘+’ button to add a new printer. Your Brother printer will be available on the list of devices.
- Select it and follow the on-screen instructions to complete the setup process.
Conclusion
That’s it! Here we conclude our blog. We hope we have answered your ‘How to connect Brother printer to computer’ query with our clear and concise guide. Before starting with the process, ensure you have the requirements with you. It includes a USB or Ethernet cable and the correct printer driver. After that, you can proceed with either a wired connection or wireless. We have covered both of them in detail. You have two options under wireless connection, you can either go with Wifi if it’s available or Bluetooth. If you still have more questions, check the FAQ section, it will answer them effectively.
FAQS
1. How to connect Brother printer to computer with ethernet?
To connect your Brother printer to your computer using Ethernet, follow these steps:
- Ensure your Brother printer and computer are powered on and connected to the same network.
- Connect one end of an Ethernet cable to the Ethernet port on your Brother printer.
- Connect the other end of the Ethernet cable to an available Ethernet port on your computer.
- Once connected, your computer should automatically detect the printer. If not, you may need to install the printer driver from the Brother support website.
2. How to add a Brother printer to your computer on Windows 10?
To add a Brother printer to your computer running Windows 10, follow these steps:
- Ensure your Brother printer is powered on and connected to your computer via USB cable, Wi-Fi, or Ethernet.
- Open the “Settings” app on your Windows 10 computer.
- Click on “Devices” and then select “Printers & scanners” from the left-hand menu.
- Click on the “Add a printer or scanner” button.
- Windows will search for available printers. Select your Brother printer from the list of available devices.
3. How do I find the Wi-Fi network name (SSID) and password to connect my Brother printer wirelessly?
You can find the Wi-Fi network name (SSID) and password on the label attached to your wireless router. You can also access your router’s settings through a web browser to view or change the Wi-Fi network name and password.
4. Can I connect multiple computers to my Brother printer?
Yes, you can connect multiple computers to a single Brother printer, either through a wired USB connection or wirelessly via Wi-Fi or Bluetooth. But make sure that each computer has the necessary printer driver installed.
5. What should I do if my computer does not recognize my Brother printer?
If your computer does not recognize your Brother printer, try the following troubleshooting steps:
- Ensure that the printer is properly connected to the computer via USB cable or configured correctly for wireless connection.
- Download and install the latest printer driver from the Brother support website.
- Sometimes, a simple restart can resolve connectivity issues.
