Do you keep getting interrupted with a “Spotify error code 4: No internet connection” error while trying to listen to your favorite music or podcast? We understand how frustrating it is. Don’t worry we are here to help you fix it and continue with your favorite tunes.
Music has been a part of our daily life as a continuous emotional and memorial support. We love to listen to music and podcasts while cleaning, traveling, or working out. With millions of users and a vast library of songs across various genres and artists, Spotify is one of the most popular music streaming platforms. However, occasional interruptions in the form of error code 4, can hamper our music experience, and it worsens if it’s recurring. We understand the struggle, so in this blog, we will share the solutions to fix the Spotify error code 4.
Let’s get directly to the solutions and keep your Spotify experience smooth and uninterrupted.
Table of Contents
How to Fix Spotify Error Code 4?
Here are 8 ways to fix the Spotify error code 4 for no internet connection.
Fix 1 – Change DNS Settings
If your Spotify can’t recognize your default DNS server, you might face the Spotify error code 4. You can solve this issue by changing your DNS settings to universally accepted like Google DNS and OpenDNS. Here is how:
For Windows
- From the Start menu, open Settings.
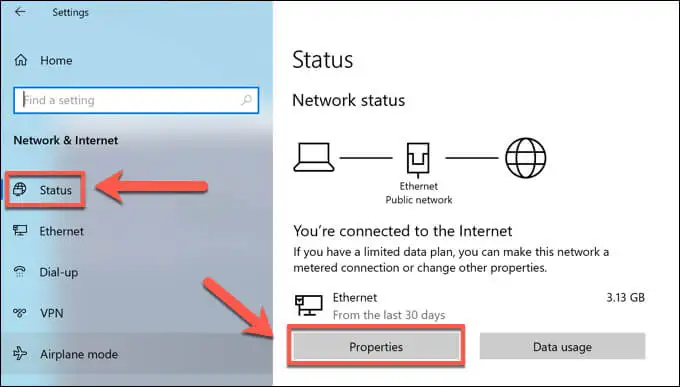
- In Settings, go to ‘Network & Internet.’
- Then go to ‘Status’ and choose ‘Properties.’
- Under the Properties menu, choose ‘IP setting’ and click ‘’
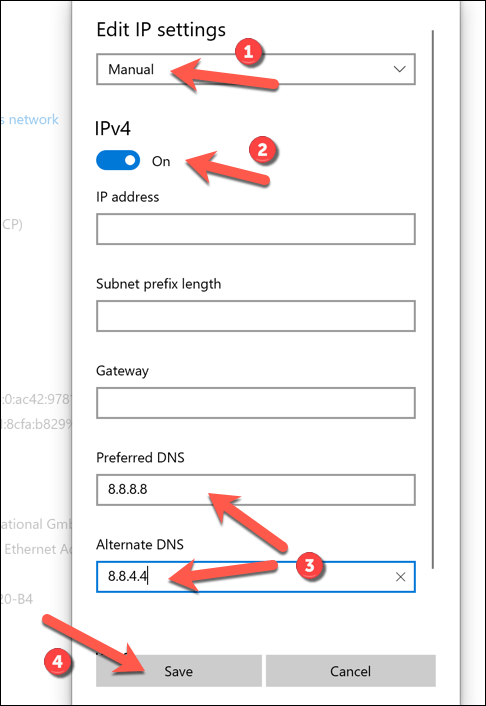
- You will see an ‘Edit IP settings’ option, under its drop-down menu, select “Manual.”
- Now, slide the IPv4 to the ON
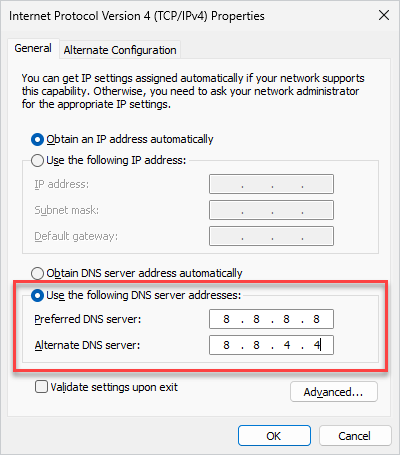
- In preferred DNS and Alternate DNS, type your suitable DNS provider. If you are using Google DNS, use 8.8.8 and 8.8.4.4 respectively.
- Finally, click on Save to save the changed settings.
For macOS
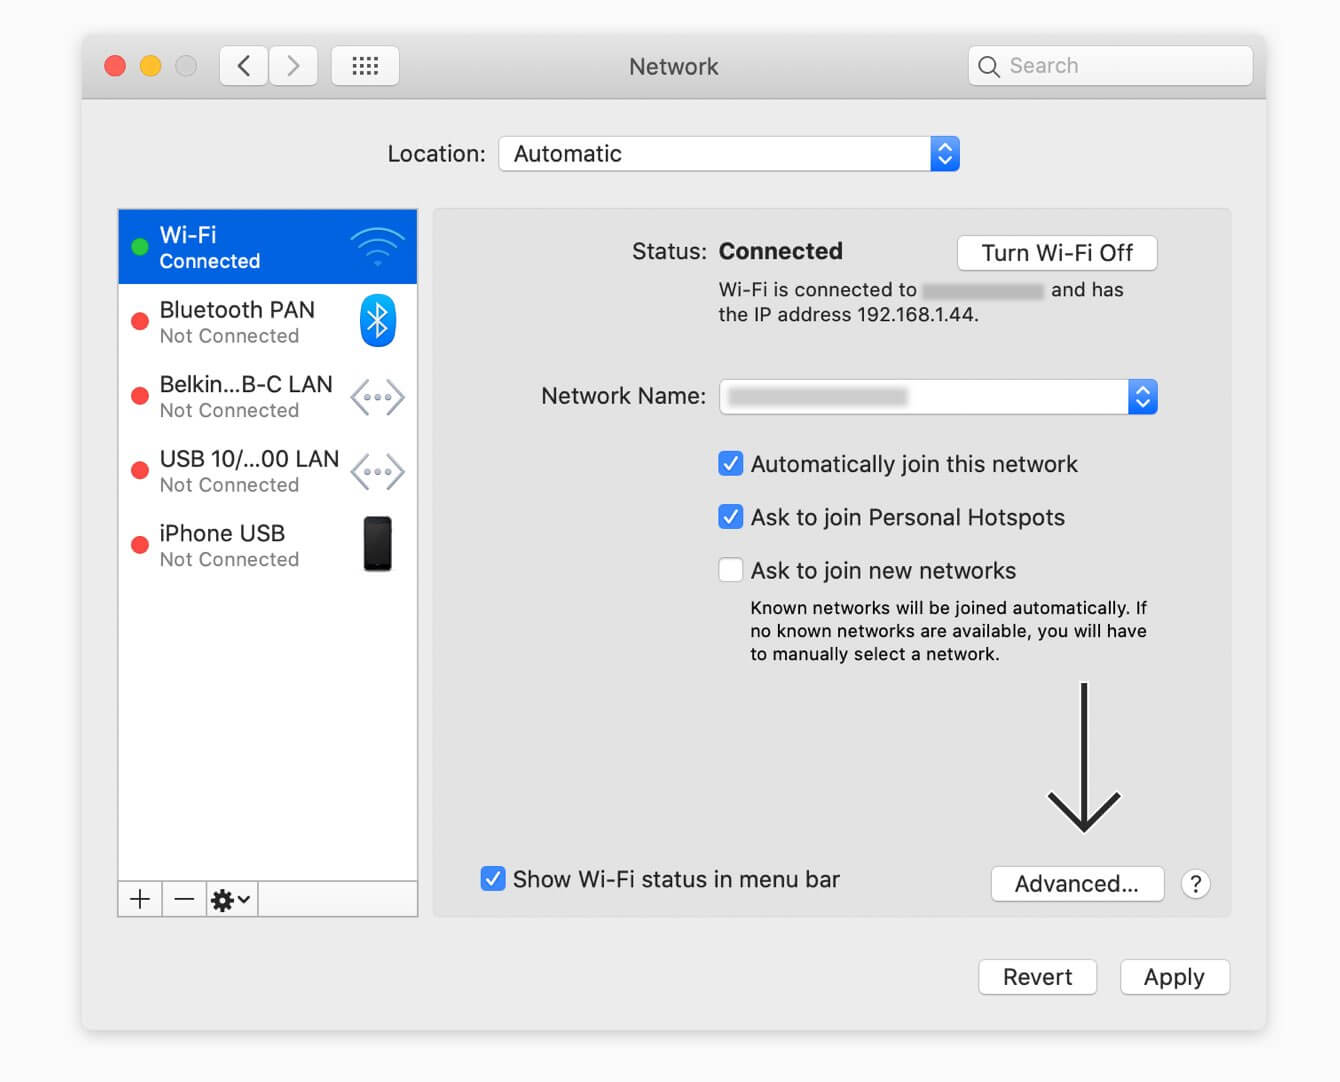
- Mac users can go to the Apple menu and choose System Preferences.
- Then select the Network option and choose your network.
- Now, click on the ‘Advance’
- Here, click on the DNS tab and click on the ‘Add’
- Add your public DNS provider and click ‘OK’ to save changes.
Fix 2 – Clear DNS Cache
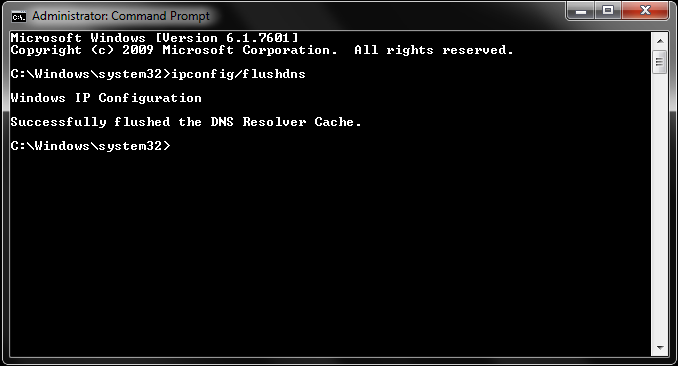
Another way to fix the Spotify error code 4 is by flushing the DNS cache. DNS stores IP addresses and related data. Sometimes this data might get corrupted or interfere with the network connection. Here is how you can get rid of it by flushing the DNS cache:
For Windows
- Open the new Powershell window by pressing the Windows + X keys.
- Once it’s opened, type ‘ipconfig /flushdns’ and press the Enter
- This will clear the DNS cache.
For macOS
- Press the ‘Command + Space’ keys to open the Spotlight search.
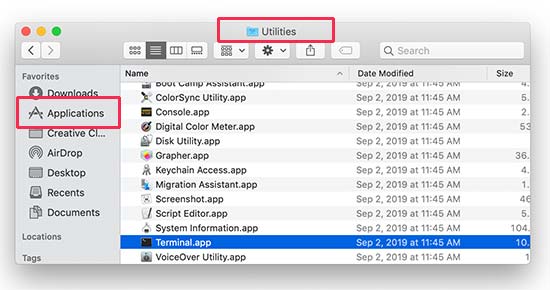
- Now, to open the ‘Terminal application’ type ‘Terminal’ and press the Enter
- Under the Terminal window, type this command – “sudo dscacheutil -flushcache; sudo killall -HUP mDNSResponder” and press the Enter
Fix 3 – Run Windows in Safe Mode
If you are a Windows user, try to run the Windows in Safe Mode with Networking to see if it works. It helps in diagnosing whether the problem is with the software or the settings are causing the problem leading to the Spotify error code 4. Here is how you can run Windows in safe mode with networking:
- Press the Windows + R key to open the Run dialogue box.
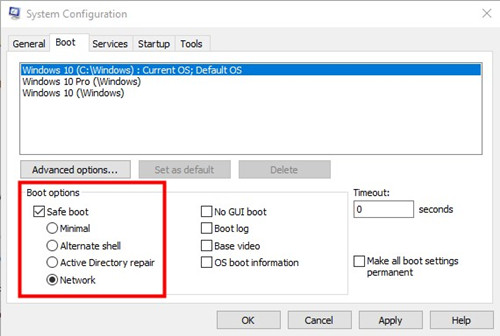
- Then type ‘msconfig’ and press the Enter key.
- This will open the System Configuration
- Here, go to the Boot tab check the box for Safe Boot, and choose your network.
- Click on “Apply” and then “OK” to save the changes.
- Restart your computer and once it opens in safe mode, open the Spotify app.
If Spotify works smoothly, it indicates that the issue is with the third-party software or settings. To fix it you can follow these given steps:
- Restart your router, yes, it sounds basic but this simple restart can resolve the issue. Switch it off, wait for some time, and relaunch it.
- Sometimes, the problem might be with your network, so try to use different networks to see if Spotify works smoothly.
- You can use your hotspot using your mobile phone. This will help you figure out if the problem is with the router or your internet service provider.
Fix 4 – Allow Spotify Through Anti-virus apps
Sometimes, your Anti-virus software might interfere and block Spotify from working. This can happen due to various reasons including false detection, firewall settings, or privacy protection policies. Here is what you can do to exclude Spotify from Anti-virus protection.
For Windows
- Open the search bar by pressing the Windows and S keys.
- Here, type ‘Firewall’ and choose ‘Windows Defender Firewall.’
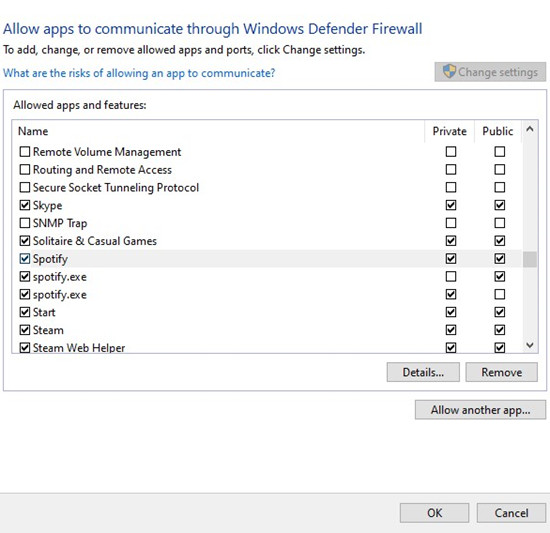
- Under Windows Defender Firewall, choose ‘Allowed apps and features.’ You will find it on the left panel.
- Go to Change Settings and select ‘Allow another app.’
- Select Spotify by checking the box next to it. Ensure that you also check the Private and public boxes for Spotify.
- Finally, click ‘OK’ to save changes.
For mac
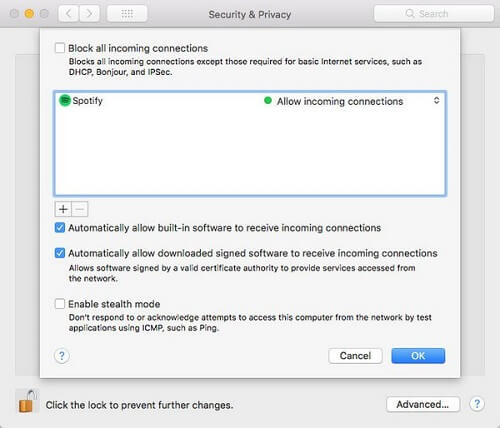
- Go to System Preferences and choose ‘Security and Privacy.’
- Now, click on the Firewall tab. Here you will see a lock icon, click it, and the system will ask for the Administrator password. Enter it carefully, this will allow you to make changes.
- Now, click the firewall option and then tap on the +
- Here, the system will direct you to choose the applications and find and add Spotify.
- Click ‘Add’ and to save the changes click ‘OK.’
For third-party Anti-Virus Software
- Open your Anti-virus software and look for the Firewall option. If it’s not available, check for Network protection or Program permissions.
- Once you find it, you will see a list of allowed applications.
- Add Spotify to the list and save the changes.
- Restart your computer and launch Spotify to see if the Spotify error code 4 is resolved.
Fix 5 – Change Proxy Settings
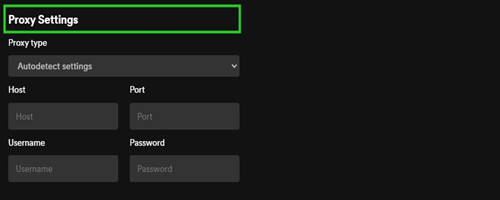
If you use a proxy server, its settings might cause problems with Spotify’s internet connection. You can follow these steps to change the proxy settings to see if the problem is solved.
- Open the Spotify app on your computer.
- Click on your username, it will display a drop-down menu.
- From this menu, click on “Settings” and scroll down to the proxy
- If your proxy type is set to “Autodetect settings” or “No proxy” change it to “HTTP”.
- To apply these changes, close the app and relaunch it.
Fix 6 – Modify Windows Host File
Sometimes you might encounter the Spotify error code 4 if your Windows host file is facing issues. This host file is used to map hostnames to IP addresses. But sometimes any incorrect entry might lead to losing Spotify’s connection with the servers. Here is how you can modify it to solve the no internet connection error.
For Windows
- Go to the Notepad app from the start menu.
- Right-click on it and select “Run as administrator.”
- Now, in the Notepad app, select the File tab and choose the ‘Open’ option.
- Then, go to this location (C:\Windows\System32\drivers\etc)
- Now, change the file type from ‘Text documents’ to “All files.”
- This will allow you to see the host files. Now select the ‘Hosts’ file and click on the ‘Open’ option.
- Once the file is open, you will see a block of text with each line starting with #
- Look for lines related to Spotify or Fastly, it may look something like this:
0.0.0.0 weblb-wg.gslb.spotify.com
- After finding the line you can either delete it by selecting the line and pressing the delete key or add # in the beginning to disable it.
- After editing, go to the file and save it to save the changes made to the host file.
- Close the Notepad app and restart your computer to see if it resolved the Spotify error code 4.
For mac
- Open the “Spotlight search” by pressing “Command + space”.
- Type ‘Terminal’ and press the Enter key to open the Terminal application.
- Now, in the Terminal app, type this command and press Enter:
sudo nano /private/etc/hosts
- It might ask you to enter your admin password.
- Now, the host file will open in the Nano text editor.
- Here, look for any line related to Spotify or Fastly. It might look like this:
0.0.0.0 weblb-wg.gslb.spotify.com
- If you find it, you can either delete it by selecting the line and pressing the Delete button or comment it out by adding the # before it.
- After editing the file Press Control + O to save the changes made in the file.
- Close the Terminal window and restart your Mac to apply the changes.
Fix 7 – Registry Settings
Certain registry settings related to internet connection can affect how your computer interacts with network resources including Spotify’s server leading to no internet connection error. Here is how you can change registry settings to resolve Spotify’s no internet connection error:
Note – Ensure that you have backed up your important data and files before executing these modifications as it might cause data loss.
- Open the Run dialogue box by pressing the ‘Windows + R’ keys.
- Now, under the run dialogue box, type ‘regedit’ to open the Registry editor.
- In the Registry Editor, go to this path: HKEY_LOCAL_MACHINE\SYSTEM\CurrentControlSet\Services\NlaSvc\Parameters\Internet
- Locate the “EnableActiveProbing” entry on the right-hand side.
- To modify the value, right-click on “EnableActiveProbing“.
- Now, in the “Value data” field, change the value from 0 to 1.
- Save the changes by clicking on the “OK” button.
- Close the Registry Editor and restart your computer to apply the changes.
Now relaunch Spotify to see if it works without encountering the Spotify error code 4.
Fix 8 – Reinstall Spotify to fix Spotify error code 4
If none of the above-shared fixes helped resolve the Spotify error code 4, consider reinstalling the Spotify application.
Read More:- “No Sound on YouTube” Error – 6 Ways to Fix it
What Causes the Spotify Error Code 4 for No Internet Connection?
Various reasons might cause you to encounter the Spotify error code 4. One of the most common reasons is a weak or unstable internet connection. But there are other potential reasons leading to no internet connection error on Spotify, including your Firewall settings that might prevent Spotify from working. This might happen if the Anti-virus falsely detects a threat from the application and blocks it. Proxy settings and corrupt host files can also lead to Spotify error code 4.
Conclusion
That’s all we have to share for now. We hope this blog helped you understand the potential reasons behind the Spotify error code 4. With the above-shared fixes, you can easily resolve this no internet connection error faced while using Spotify. You should understand whether the issue is caused by third-party software or the settings.
You can find it by running the windows in the safe mode, we have shared the detailed instructions about how to do it. Changing DNS and Proxy settings can also help you with the issue. Other advanced options include editing the registry settings and modifying the Windows host file. If you have any doubts about the Spotify error, let us know in the comments. Happy streaming!
FAQs
1. What is Spotify Error Code 4?
Spotify Error Code 4 is a connectivity issue that occurs when the Spotify app can’t access the internet or connect to Spotify’s servers. It is usually due to a weak or unstable internet connection.
2. Why is my antivirus blocking Spotify?
Antivirus software may block Spotify due to false threat detections, firewall settings, privacy protection features, or outdated settings.
3. How do I change proxy settings to resolve Error Code 4?
To change proxy settings, you need to go to Spotify’s settings, scroll down to the Proxy section, and simply adjust the Proxy Type settings to “HTTP“.
4. Is it safe to adjust registry settings while fixing Spotify Error Code 4?
Adjusting registry settings is a risky solution. Any incorrect changes can destabilize your system. We recommend you back up your important data before adjusting it.
5. How do I reinstall Spotify to resolve Error Code 4?
To reinstall Spotify, uninstall the app from your computer, download the latest version from the official website, and reinstall it.
